Heather Ross Rainbow Pouch

If you follow my blog you might be getting sick of seeing pouches but I have another to share with you. This is a pouch that I made for my swap partner for the Pretty Little Pouch Swap on Flickr. I had never done anything rainbow before or with Heather Ross but I had a little bicycle sent to me in a package and thought it would make my partners day. I sure hope it does. I had a lot of fun making this!

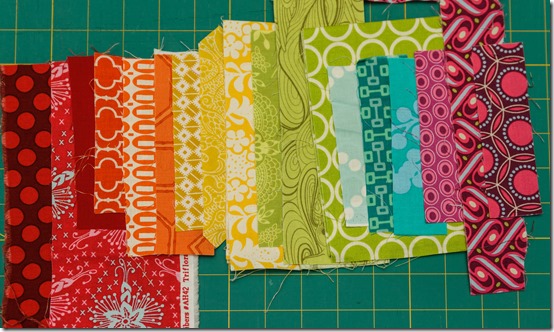
I first cut out a hexagon and then basket weaved the rainbow on either side. I decided to put the bicycle in where the orange is since its coloration worked best there.

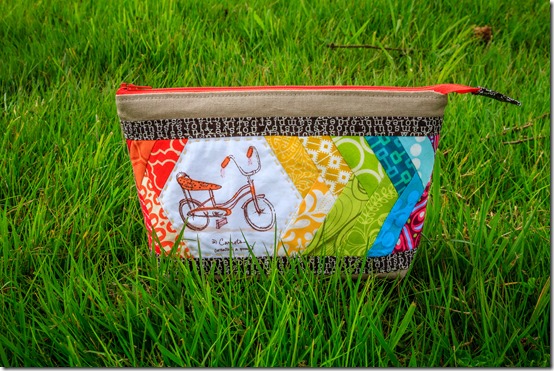
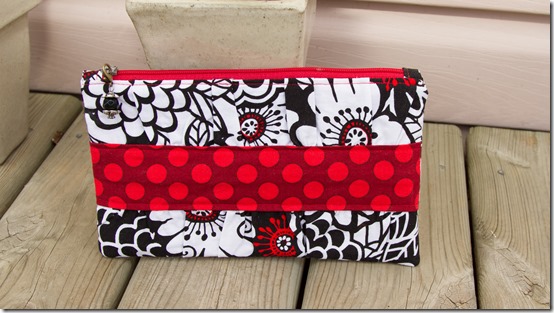
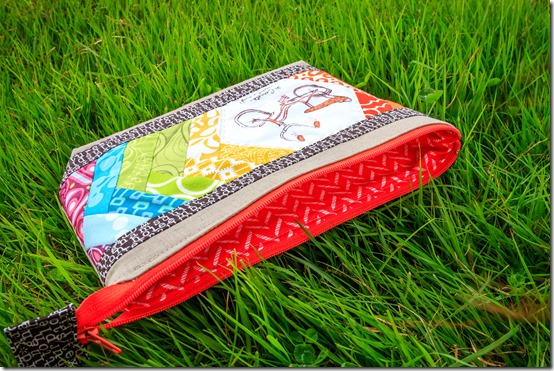
I used red for the lining and a darker orange zipper. This pouch will not make you grumpy that is for sure!

I also decided to work on my hand quilting skills. I quilted on the inside of the hexagon with yellow and on either side if the inside of the border text print with a cream thread.

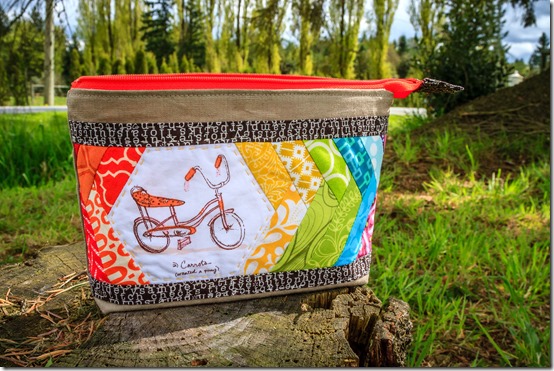
I used the Noodlehead open mouth pouch tutorial size small. Except the gussets are a little smaller on the inside because I didn’t want the panel too close to the bottom.

linking to: Fabric Tuesday on Quilt Story and Finish it up Friday at Crazy Mom Quilts

Style Stitches

I finally made a project out of Amy Butler’s Style Stitches book. (I only have had this book for two years.) I made the Key Keeper Coin Purse. I nicknamed it the teardrop pouch since it is suppose to go with the teardrop purse. I used some Anna Maria Horner feathers in denim and essex linen in putty. Yes I know I have been making a lot of pouches lately.

It was a pretty quick sew. I had some issues with bulk at the end of zippers but there is not much to be done about that. and the band seams don’t quite meet up on the sides but shhhh it was my first time dealing with a zipper and a band.

I had bought these little charms that were on clearance at the craft store. I thought they would be sweet for zipper pulls. I happened to have one with a feather on it and thought it was the perfect touch for this simple pouch!

Oh and I apparently didn’t put the little loop in the right spot. Oops! I figure it is not a huge deal, right?!

A little sneak pic of the inside. Taking pictures of the inside of pouches is tough! There is a pocket on the inside. I used the butterfly print from Field Study for it but you can’t really see them.

I am thinking I am going to have to make another one for me! This is the perfect lip balm purse pouch I think because this one is heading to my Pretty Little Pouch Swap partner as an extra little treat!

linking to finish it up friday at crazy mom quilts

Stuff

In the past week I made some cute drawstring bags four of them to be exact two for a birthday and a couple just because. Sadly I didn’t get any pictures of them, shocking I know! Although I did get a picture of the pouch I made for my dear friend that had her birthday over the weekend. Yes, another Noodlehead gathered pouch. This time I did not break my sewing machine needle and it went together quite smoothly. I even put little card holder pockets in the inside.


I finally finished one of my pay it forward gifts but I can’t share that until it reaches Australia. I am soooo excited to show you what I made. So check back.

I started practicing my FMQ for my Lilly Belle quilt a bit ago. Needless to say I will not be making my goal to finish this by the end of the month. (I blame it on the gifts I made, lol, okay maybe I am just avoiding it) I know you can barely see it but I think I prefer that my Aurifil thread is the exact color of my Kona Bone since I am still working on the evenness of my stitch lengths.

Lastly I am finally making a rainbow project for The Pretty Little Pouch Swap. Super excited to show you guys that too but for now a sneak fabric peek…

Linking to Fabric Tuesday at Quilt Story

241 Tote

I finally made a 241 tote!!! (pattern designed by Ana at Noodlehead) I printed the pattern pieces at 75% on my printer to make it smaller for my daughter. I ordered the fabric from Pink Castle Fabrics (consulting her of course) we decided on purple since it is her favorite color. When it arrived she was so happy and about five minutes later she asked me if her purse was finished. This happened a lot in the next 24 hours. She was very persistent. I needed a few supplies like interfacing and a snap before it could get done. Luckily we were able to go get some so I started the tote the day after the fabric arrived. I didn't put in any zippers and I added an adjustable strap (1 1/4” hardware that I happened to have took off of an old purse) I figured her tote can grow with her a bit better with an adjustable strap. It was pretty quick project to make!

A little pocket in the inside:

The next morning she had her bag and oh was she happy! She loves it and totes it around the house. She even went to get produce with her dad carrying the grocery list and shopping bags in her 241 tote.

(Fabric: Robert Kaufman Essex Linen in Putty, Echino Maruco Dot in Purple, and Kokka by Ellen Luckett Baker in Stamped Ladybug in Purple)

linking up to finish it up friday at crazy mom quilts

Rainbow Thread

Some days I think that may daughter is half duck because she loves to go out and play in the rain. Last week after coming inside from the rain. She started collected scraps from what I was cutting (yes they are little pieces of purple bunny posy print I almost said no but embraced her creativity, lol) then asked me for a needle and rainbow thread. This is her very first time sewing. She very carefully sewed the pieces together forming a big knotty mess that she called a kite. She loved it but then asked to use my sewing machine…I told her she was a little too little to use mom’s sewing machine. I think we have a little girl who is interested in sewing in the house!

A Boxy Pouch

This week I have a small finish to share. I finally made a boxy pouch! (I have been learning how to put in zippers and how to make various pouches lately.) I followed this tutorial at So Chick! blog.  I found that this project was pretty quick and easy. The zipper didn’t give me any troubles although since it is a vintage zip it is a little sticky for some reason. I also used fusible interfacing that has seemed to crease and wrinkle where the pouch can fold up. You can see it, it annoys me. You see I was going to give this pouch away but now it just isn’t worthy! So it has to stay home with me storing some blocks I am working on. I am still learning… I will try again! 

Fabric is from the Amy Butler Soul Blossom collection, Delhi Blooms in Grass

Linking to finish it up friday at crazy mom quilts

Pretty Little Pouch Swap

I joined another swap. I am excited about this one since I have been on a pouch kick lately! If you want to join you can find it here Pretty Little Pouch Swap on Flickr

Here is my mosaic. Cute, eh?!

I have to say I love that Liberty pouch! Click on the mosaic to go to Flickr and find the links to the wonderful ppl who made them!

Now I have to be patient and wait for everyone to sign up so I can get a partner, Eek!

Science Fair Quilt

My husband and I are building a house with his parents. It has been a long process and they say we will be moving soon, we will see, lol. Through it all my sister in law Kelli and her husband Jeff have been there to help design, consult and put some labor in. They are both architects and are amazing at what they do. When I saw Architextures I knew they had to have it in their house. When I was on the search for a pattern and came across Jaybird quilts Science Fair pattern I knew it was meant to be. It just suited them. The perfect thank you gift. I thought so and my Mother in Law thought so too. So we went ahead about bought the fabric.

I had a small hiccup when my jelly roll was 1/8 of an inch too narrow but we decided to shrink down the template and it worked perfectly. In the end the quilt is about 2 1/2 inches smaller in width and length. (Not a huge deal.)

I really enjoyed making this quilt. It was actually pretty quick and came together nicely. I finished it by quilting on an angle randomly spaced.

I ordered some yardage for the backing. I wanted to make the backing scrappy since the prints are so pieced within the quilt top.

I was happy with the results of making bias binding for the first time. It went in and out of those concaved angles perfectly. 

Linking to finish it up friday at crazy mom quilts and Friday Felicities at Felicity Quilts

April Goal

I am going to finish my Lilly Belle quilt! That is right I made a quilt for myself and still haven’t finished it. This quilt is all ready to finish! I just need to quilt it. I am struggling on how to quilt it. I am not confident in FMQ yet so I need to figure out what direction I want to straight line quilt. Suggestions?

I have already pinned and tried to quilt it but it shifted all over the place. (well I quilted five rows.) It is now unpicked and ready to spray baste. No more pins for big quilts for me!!! So I must try again and just finish it so I can enjoy snuggling under this quilt!

Sorry for the crappy phone picture…

linking to A Lovely Year of Finishes April goal party at Fiber of All Sorts and Sew Bittersweet Designs 

Back to Home Back to Top Making Life Prettier. Theme ligneous by pure-essence.net. Bloggerized by Chica Blogger.